|
|
By Lindsay, on August 18th, 2014 Click on photos to expand Did you know there’s a name for the veggies overflowing your crisper/garden/CSA box right now? Cucurbitaceae! Zucchini, summer squash, cucumbers, melons…we’re kind of drowning in them over here. Well, not melons, so much, and our little muffin (9 months tomorrow!) devours zucchini and summer squash, so we don’t really have a problem with that, but all the cucumbers are in our refrigerator right now. ALL! So. Many. Cucumbers.
We’ve eaten summer salads for days. I’ve blended them into smoothies. I’ve even baked them into pancakes with questionable success. Pickles? Done. And I don’t even love pickles.
What do I love? Warm smooshy things in bowls that don’t take forever to make. Bonus points if The Muffin likes it. Extra bonus points if he can feed it to himself. Super extra bonus points if leftovers are still tasty. What fits the bill? Cucumber risotto. “EWWWWWWWWWWWWW!”, you say? “Delicious!”, I counter. “EWWWWWWWWWWWWWWW!”, you still say. Well, everyone’s entitled to her opinion, but this risotto is sweet and subtle and creamy and lavender/green. If you still don’t trust me, substitute zucchini – I have and it’s great.
Apologies (once again) for the phone photos. We’ll figure out this technology thing, I promise!
Cucurbit Risotto
Adapted from Greene on Greens
Serves 4-6 as a main
| Amount |
Ingredient |
Preparation |
Notes |
| 4 TBsp |
Butter |
Divided |
Kate’s Homemade Butter |
| 1 medium |
Red onion |
|
Farmer Dave’s CSA |
| 2 cloves |
Garlic |
Minced |
Farmer Dave’s CSA |
| 1 cup |
Arborio rice |
|
|
| Good pinch or two |
Crushed red pepper flakes |
|
|
| About 4 |
Cucumbers (whatever size you have – use more if they’re tiny or fewer if they’re gigantic) |
Peeled, seeded, and diced |
Farmer Dave’s CSA |
| 3 cups |
Chicken stock |
|
Homemade |
| To taste |
Salt and pepper |
|
|
| Small handful |
Fresh, soft herbs |
Such as dill, basil, parsley, and fennel fronds |
Chopped |
Directions
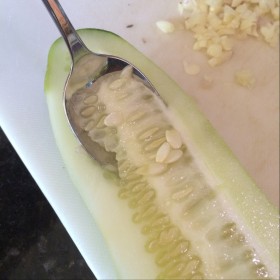
- Heat the chicken stock (on the stove or in the microwave). Prep your veggies. You don’t have to be too fussy with seeding and peeling the cucumbers. I think it’s easiest to seed cucumbers by cutting them in half the long way and scooping out the seedy middle with a spoon. (See picture above)
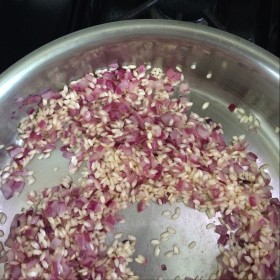
- In a heavy skillet, melt half the butter (1 TBsp) over medium-low heat. Add the red onion and sweat (cook slowly without browning) for 2 minutes; add the garlic and cook for another minute.
- Thoroughly stir the rice into the onion mixture, so that each grain is coated with butter.
- Add the cucumbers and crushed red pepper flakes. Stir well, then use your spoon to smooth and level the rice mixture in the pan.
- Gently pour a generous 1 cup of hot stock evenly over the rice mixture. Don’t stir. Just let the rice absorb the liquid, which should take about 15 minutes.
- When all the liquid has been absorbed, stir and repeat with another generous cup of stock. Reduce the heat if the last batch was absorbed in less than 15 minutes.
- Stir in the last 1/2 cup or so of stock. Keep your eye on the risotto this time. It’s done when the rice is tender, but not mushy. If it’s the right consistency, but there’s still liquid in the pan, raise the heat to boil it off. If the rice isn’t ready when all the liquid is gone, add a little hot water and keep cooking.
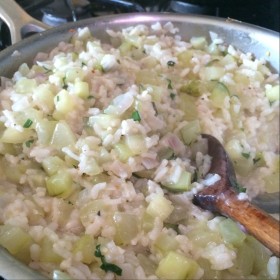
- When the rice is perfect, stir in the remaining butter (1 TBsp) and salt, pepper, and herbs to taste.
By Lindsay, on July 21st, 2014 Click on photos to expand I had planned to post a delicious way to use up all those CSA greens, but then Erik met a friend for a drink last night and I made myself a post-baby-bedtime cocktail.
While sipping said amazing cocktail (and then wanting another), I realized that we never posted our favorite jam recipe. So here it is – blueberry lime jam + blueberry bramble cocktail. It’s also awesome as the filling in a coconut layer cake or stirred into yogurt (especially homemade!). Enjoy.
NOTE: In the interest of brevity, I haven’t included detailed canning instructions. See our post on canning for more details on the canning process and safety. If you haven’t canned before, this is a good one to start with, because it’s just as good as a syrup, so you really can’t mess up on the gelling stage.
Blueberry Lime Jam
Makes about 10 quarter-pint (4 ounce) jars
| Amount |
Ingredient |
Preparation |
Notes |
| 5 cups |
Blueberries |
|
Kimball Fruit Farm |
| 5 cups |
Sugar |
|
Bulk |
| 1/3 cup |
Lime juice |
|
|
| 1 lime’s |
Zest |
|
|
Directions
- Prepare your jars, lids, bands, and equipment.
- Put a couple of small dishes in the freezer. You’ll see why…
- Put all the ingredients into a big pot – the wider, the better – and boil until gelled, stirring occasionally. A wide pot will help this happen faster than a narrow one, but it could take about 20 minutes of boiling. Be careful to keep the boil under control – stirring more frequently as time goes on will help with this; sugar boils up and out of the pot quickly and can cause nasty burns.
To test for gelling, put a teaspoon of jam on one of your freezer plates and return to the freezer for a minute or two. If you can draw a clean line through the jam after this short stint in the freezer, it’s ready. (See our vanilla rhubarb jam post for a photo)
- Fill your jars, leaving 1/4 inch headspace
- Process for 10 minutes.
Now for the fun part – 1 ounce lemon juice, 1-2 ounces vodka or gin, 1 tablespoon jam, and finish with ice and seltzer. Mmmmmm….
By Lindsay, on March 29th, 2014 Click on photos to expand This week, I stumbled into two great examples of how food brings people together. First, we scored some local grains (for free!) from a poster on a Yahoo listserve for local parents. Super! After a short trip and a nice conversation, we are the proud owners of two quarts of local oats and some helpful info on CSAs in the area. Not quite sure what we’re going to do with the oats, but I’m excited to experiment and look into a couple of new sources for local food.
The second happened through a fantastic Facebook group of the most supportive, humble, self-deprecating, other-cheering, hilarious, and generous community of women. For the last couple of months, I have been talking to some women about breastfeeding and our little ones’ reactions to food we eat. Finley seems to have had mild reactions to dairy and soy in my diet, so I’ve cut those out for the time being. One of the other women, however, has had to eliminate practically everything delicious and convenient. Boo! But hurray to her for soldiering on! She had a particularly tough week, so I offered to bake a treat that she could actually eat. No easy task, but fun for this food nerd. No eggs or dairy – not a big deal, since there’s a lot of info out there on modifying existing recipes for vegans. The biggest issue was avoiding corn. “Whatever, just don’t make corn bread,” you say. Ha! Did you know there’s corn in baking powder?? I didn’t. Luckily, the internet exists. Baking soda + cream of tartar = corn-free baking powder.
We had a lovely chat when I dropped off the bread and agreed to get together for a walking date later on. Yay for new friends!
I didn’t have any of the bread (which is based on another Joy the Baker recipe), because wheat and I aren’t getting along at the moment, but my mommy friend says it was delicious. It makes two loaves, so wrap one well and freeze it or give it away and make a new friend yourself.
Allergy-Sensitive Butternut Squash Bread
Makes 2 loaves
| Amount |
Ingredient |
Preparation |
Notes |
| 3-3/4 cups |
All purpose flour |
|
Bulk |
| 2 cups |
Sugar |
|
Bulk |
| 2-1/4 tsp |
Baking soda |
|
|
| 1/2 tsp |
Cream of tartar |
|
|
| 1 tsp |
Sea salt |
|
|
| 1 tsp |
Ground cinnamon |
|
|
| 1/2 tsp |
Ground cloves |
|
|
| 1 pint |
Butternut squash puree |
Substitute 15-ounce can of pumpkin puree |
Homemade from Red Fire Farm CSA |
| 1 cup |
Canola oil |
|
|
| 1/3 cup |
Maple syrup |
|
Hollis Hills Farm |
| 2 TBsp |
Molasses |
Blackstrap or regular |
|
Directions
- Preheat the oven to 350 degrees.
- Prepare two loaf pans (8 x 4 x 3 inches) by lining with parchment paper – cut two strips of parchment paper about 8 inches wide and long enough to hang over the edges of the pans; crease into the corners of each pan to create a sling to lift out the baked bread. If you’re not concerned about allergens, you could grease and flour the pans instead (making sure to knock out the extra flour).
- Whisk together the dry ingredients (including sugar, which is usually considered wet).
- Whisk together the wet ingredients (add about 1/4 cup of water if you use commercial canned pumpkin).
- Pour the wet ingredients onto the dry and mix just until combined. If you mix like crazy, you’ll develop the gluten in the flour and end up with tough bread.
- Divide the batter equally between the prepared loaf pans and bake for about 1 hour (until a toothpick inserted in the center of each loaf comes out clean).
- Cool in the pans for 10 minutes (20 if you didn’t use parchment paper). Remove from the pans and cool completely on a wire rack.
By Lindsay, on March 18th, 2014 Click on photos to expand Well, we’ve been busy! Obviously not with the blog, but with, y’know, life. A week after our last post, our son, Finley, was born. He’s amazing! We’re loving parenthood, but have struggled to find time to blog. We’ve been using our pantry and freezer a lot. When we cook, it’s mostly old favorites that we’ve already posted or really easy things, like the sausage (from our local butcher) and roasted veggies (from our CSA) that . . . → Read More: Hello, again!
By Lindsay, on November 13th, 2013 Click on photos to expand Since we first posted our yogurt recipe (really more of a method), we’ve made a few changes.
First, we no longer let it “yoge” in the oven. After forgetting that it’s in there and baking it once too often, we’ve started culturing it in the microwave. This works great!
Second, we’ve been whisking in the culture once the milk cools to 130 degrees, rather than 120 degrees. This seems to result in a creamier . . . → Read More: Yogurt Update
|
|