
Fall in NYC brings an abundance of dark, leafy greens. Prepping any type of leafy green is a similar operation, but some greens require a little extra TLC because the ribs and the leaves cook differently. This means that you have to separate the two in order cook everything nicely. While this is always an option with softer greens like kale or spinach for taste or texture preferences, with tougher greens like Swiss chard and collard greens it’s kind of non-negotiable.
Note about washing and storing greens:
- If you know and trust your farmer, washing greens is more about getting the dirt off so you don’t dull your knives or hurt your teeth. If you wash the greens before you chop them, fill your sink (or a salad spinner) with enough water so the greens will float. Toss them in and swirl them around a bit. The dirt will fall to the bottom and you can scoop the greens off the top. If you chop them first, you can save some water by rinsing them in a salad spinner (if you have one).
- If you don’t know or trust your farmer, add regular white vinegar to the soaking water and let everything sit for a few minutes before rinsing well. Check out this NPR story if you want more information.
- Either way, if you do this before storing the greens (the way we do it), make sure you dry the greens thoroughly, wrap in paper towels, and tuck into a plastic bag before placing in the refrigerator. The drier they are, the longer they’ll keep. If you do all this you can get up to 5 or 6 days in the refrigerator without serious wilting, otherwise you should use them sooner.
Directions:
- Trim the stems at the point where the leaves begin. It’s helpful if you leave the rubber band on, so that the stems stay together. Save the stems for later, but put them aside for now, except for the last inch or so at the “ground” end of the stems, which you should cut off and discard.

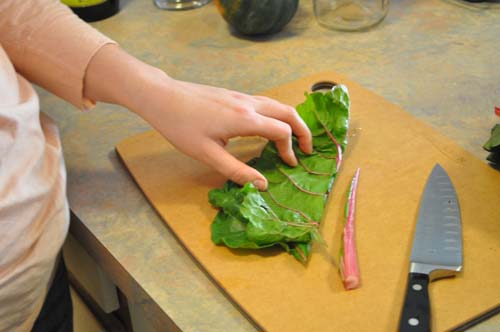
- If you want to remove the ribs, take each leaf, one at a time, and fold it in half along the rib. Run your knife along the rib (towards you) to separate it from the leaf.


- Gather up all of the ribs and stems from the first two steps, and cut them into bite-sized pieces (about 1/2 to 1 inch).


- For our dinner, however, we wanted to cut the greens into “ribbons”, so they would be more evenly spread out in the dish. We also like using raw greens in salads, but they have to be sliced thinly the same way or you risk wearing out your jaw. To do this, lay out 5 – 6 of the leaves in a stack. It’s helpful to put bigger leaves on the bottom and smaller leaves on the top. If you removed the ribs, fold the stack in half on the cutting board. If you didn’t remove them, roll up the stack like a cigar.
- Next, cut the stack or roll cross-wise into “ribbons”. If you are cooking the greens, 1/2 to 1 inch ribbons work well. If you’re eating them raw in a salad, you might want them thinner.

These are the basic steps for prepping “stemmy” leafy greens like Swiss Chard. Now, if you plan to sauté the chard you would want to give the rib pieces about a 5 minute head start (maybe with some onion and garlic) before adding the actual greens to the pan. The ribs are perfectly edible, but they tend to be fibrous (kind of like celery) and need this extra step.


One more note: we forgot to wash our Swiss Chard at the beginning of the process. Chard with the full stems is a bit unruly for our salad spinner, so we would normally wash everything after step #1 (or even step #2). This time, however, we made the mistake of throwing all of the ribboned leaves and cut-up stems into our salad spinner and washing them after the fact. Don’t do that. In order to properly sauté the ribs for 5 minutes before adding the greens, we had to pick them all (or most of them) out of the mix. What a pain! Nobody’s perfect!

This is a great blog. I just started with a CSA this year so I am digging into more blogs for information. I love the CSA here in CO but I have to admit I was kinda at a loss for what to do with all the root vegs. and dark leafy like kale etc. I jumped into it with knowning how to cook greens at all. I think it’s an education for so many people our parents just didn’t cook like this, or at least mine didn’t. Congrats on all your sucess, wish me luck, I’m getting there.
Thanks Roxanne. You are actually our first commenter who isn’t friends or family, so we really appreciate the feedback!
You hit the nail on the head. Even though we haven’t gotten around to writing our “about” page, we are really trying to re-learn a lot of the food skills that we’ve all lost in the past 60 years or so. If you are eating seasonally, how do you deal with root vegetables in the winter? My mom had one or two recipes, but that’s not enough. It’s especially true if you’re doing it via a CSA because you’re likely to be inundated with a lot of one ingredient all at once. You need to get creative!
We’ve also gotten into canning as a means of stretching the time horizon of summer foods. It was worth it. We used our first home-canned tomatoes the other day. They came from New Jersey, have no preservative, sodium, or other bad things (like BPA in the can), and were delicious.
As we cook, we intend to keep writing things down and taking pictures, so please bookmark us!
Also, we’re curious to know how you found us?
Thanks and enjoy,
Erik (and Lindsay)
In this recipe you can cahnge the fish, marinade and veggies to reflect a new kinf of cusine.*greek w/artichokes, black olives, red onion, bell peppers*spanish w/ garlic, roasted peppers, green olives, potatoes, zafron. And so on do your own mixed and match. Bake your favorite lasagna and insted of using pasta use slices of par-broiled egg plant. Also you can do roasted veggies, sliced thin; but thick enough so they can hold some crunch. Carrots, egg plant, onion, squash, bell peppers, use rosemary, garlic and oregano to season. Broil @ 450* for 35/45 min. Then after cool, use low carb flour tortillas and low carb/fat cheese of your choice (I use brie or pepper jack). And make yourself killer quesadillas, at this time I add tomato slices. You can can served with salad, veggie chili or some chicken soup or spicy tomato soup.My personal recipe collection
[...] How to Prep Dark Leafy Greens [...]
[...] roasting just for this recipe, leave out the garlic and go easy on the salt) 1-2 bunches of dark, leafy greens (leftover sauteed greens or fresh) 3-4 cups of cooked grain (see table below) 1 cup of red onion [...]
[...] wrinkled and rubbery and are no longer salad-worthy, we use them in a frittata. If we sauté leafy greens and don’t eat all of them, they don’t reheat well, so we use them in frittata. In [...]
[...] Onions, mushrooms, sautéed greens, peppers, tomatoes. Really whatever’s in [...]
[...] Remove the stems and ribs from the mustard greens and chop both the mustard greens and kale into 1/2-inch ribbons (see directions here). [...]
[...] the kale into 1/2- to 1-inch ribbons (see directions here) and place in your largest [...]
[...] the dough is rising, get a big pot of water boiling. While it’s heating up, prepare your greens by removing the [...]