How to make yogurt. This post is going to make some of you categorize us as hippies. I’m okay with that, because I know we’re right. ![]() But you should really give it a try once before ruling it out!!
But you should really give it a try once before ruling it out!!
- It tastes better! Really!! Homemade yogurt is much smoother than the commercial stuff, because the culturing process is slower. It’s also mellower, at least the way we make it. If you like really tangy yogurt, you can let it culture longer.
- We eat yogurt almost every day for breakfast and like knowing exactly what goes into it.
- It’s cheaper than commercial yogurt made with local milk from grass-fed cows. We make about a quart a week, which costs us $4.
- The dairy reclaims the bottle and we use the same glass container all the time, so there’s very little waste, especially compared to plastic single-serving tubs.
- It’s kind of a fun little science project every week or so.
Now that we’ve convinced you to DIY, please don’t go buy an expensive yogurt maker. You only need a few pieces of equipment, all of them multi-taskers:
- Heavy-bottomed pot with lid (at least 1 quart capacity)
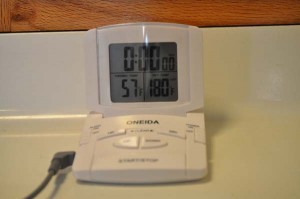
- Digital thermometer*
- 1-quart glass jar
- Funnel (optional, but helpful)
- Hand- or dishtowel
* A digital thermometer is really nice for this, because you can set the alarm to go off at a specific temperature, rather than sitting by the stove. We have one like this. Any thermometer will work, though.
The logic behind this process is to heat the milk enough to kill any bad bacteria and then let it cool down enough to encourage the good bacteria in the yogurt starter to thrive. It’s important to note that it will never turn out the same way twice, because there are so many variables – what the cow ate, how quickly the milk warms up and cools down, how warm it stays while culturing. Sometimes there’s a little whey, sometimes it’s thicker, sometimes it’s thinner, but it’s always tasty.
Ingredients:
1 quart (32 ounces or 4 cups) whole or low-fat milk
2 tablespoons yogurt as a starter (either from a previous batch or store-bought with live, active cultures)
Directions:
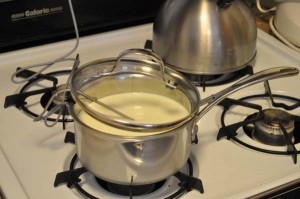
- Pour the milk into a heavy-bottomed pan, set up the thermometer, and set the alarm to 180 degrees (if you can). We thread the probe through the wires of a binder clip attached to the slide of the pan. Make sure the probe doesn’t touch the bottom of the pan. Heat (covered) over a low flame until the alarm goes off (or the temperature reaches 180 degrees). This usually takes about 15 minutes.
- While the milk is heating, measure out the starter and leave it on the counter to come to warm up. The good bacteria aren’t “hungry” when they’re cold.
- Once the milk reaches 180 degrees, take it off the heat and take the lid off. The milk might have a skin on it, but that’s fine. You can just whisk it away later. Allow milk to cool down to 120 degrees. It could take up to an hour, depending on the temperature of your room. We usually set an timer for 15 minute increments, so that we don’t forget we’re making yogurt.
- While the milk cools, wash a 1-quart glass jar and lid and get out a towel.
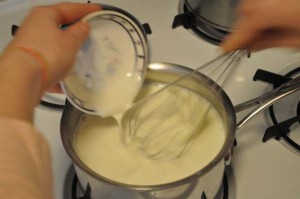
- Once the milk reaches 120 degrees, whisk in the starter, trying to eliminate any clumps.
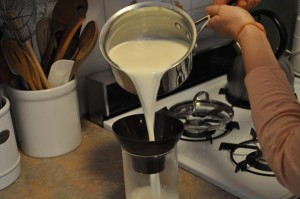
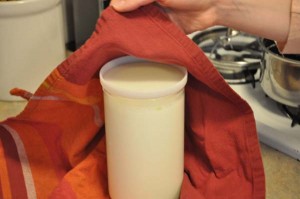
- Carefully pour the milk mixture into the glass jar (a canning funnel is really helpful here), wrap the jar in the towel, and set it somewhere warm for 6-10 hours before refrigerating. The amount of culturing time depends on how you like your yogurt. We usually let it sit for 7-8 hours. It will be mellower and thinner, if you leave it for a shorter time. It will be tangier and thicker, if you leave it for longer. Because there aren’t any preservatives, it will also get tangier as it sits in the refrigerator, so we usually err on the early side. Most of the year, we just leave the jar out on the counter away from any drafts or breezes. If our apartment is chilly, we heat our oven on the lowest setting (140 degrees for our oven) for 15 minutes and let the yogurt culture in the oven with the door closed and the heat off. I’ve also heard of people using heating pads, which we might try this winter.
Notes:
- I suppose you could use skim milk, but not for your first try. We’ve found that skim makes pretty thin yogurt.
- We always save the last bit of yogurt as the starter for the next batch. If you have more than two tablespoons left or aren’t planning on making another batch right away, save it by freezing 1-tablespoon portions in an ice cube tray. Then just take two out to thaw while you’re heating up the milk next time. You could also give it to a friend who wants to start making yogurt and get a nerdy thrill from passing along your yogurt strain.
- I have read that slower heating and cooling creates a silkier yogurt, so be patient, if you can.
- Try not to jostle the yogurt too much while it’s “yoging”, because it will disrupt curd formation, leading to a watery final product.
- If you’re a fan of Greek yogurt, let the yogurt strain through a coffee filter in the refrigerator until it’s as thick as you’d like it.
- If you like your yogurt sweet or flavored, try adding (local) honey or jam.
- Yogurt isn’t just for breakfast! Use it in baked goods as a substitute for sour cream or buttermilk. It also makes a good marinade.

Tried your recipe this week. It’s yogging in the microwave(off of course). Thanks for making clear instructions on this!
¡Touche! Razonables criterios. Manten este nivel es un articulo fantastico. Tengo que leer màs posts como este.
Saludos
[...] on buttered bread or muffins. Use it to replace the oil in baked goods. Stir it into oatmeal or yogurt. Make a PBAB (peanut butter and apple butter) sandwich. Grab a spoon and dig in. DIY, [...]
[...] Part 1 is how to make your own yogurt [...]
[...] insanely easy. Will we use it every time? Probably not. In most recipes we substitute our homemade yogurt for sour cream, but it might be worth it the few times we can’t make the [...]
[...] there isn’t a use for the last tiny bit of jam or apple peelings, but there is! Flavoring yogurt and pectin stock for jam and jelly! So [...]
[...] Homemade with milk from Milk Thistle Dairy Farm * [...]
[...] Yogurt (optional) [...]
[...] we’ve finally done it. We’ve been making our own yogurt for almost three years now. You need to let it sit out for eight hours to culture at room [...]
[...] the buttermilk last. We did not have any buttermilk, local or otherwise, so we used 2 cups of our homemade yogurt mixed with 2 cups of low-fat milk (all from milk from Shaw Farm). It worked as a substitution, but [...]
[...] want to split two dozen muffins or a whole coffee cake with Erik over the next two days. Yogurt and granola parfait with strawberries? I just couldn’t decide. So then I forgot all about [...]
[...] Homemade [...]
[...] we first posted our yogurt recipe (really more of a method), we’ve made a few [...]